I have to admit, 2013 has been a slow knitting year for me. I didn't knit an awful lot.. a lot less than I would have wanted to.
Hopefully this year will be full of fun knitting projects :) I've already got one in mind - this toddler tiered coat for S :) I already bought the yarn for it.. Cascade 128 Superwash (the same yarn I knit Jo's legwarmers with). It was on sale at Mary's Yarns and I had to snag some today! In fact, I'm tempted to start the project tonight... :)
Wishing everyone out there a safe and wonderful 2014!
December 31, 2013

November 27, 2013
Jo's Leg Warmers
A few months ago my friend Jo (who I've known since high school) approached me about making her a pair of custom leg warmers. She couldn't find any that fit her properly and in a style that she wanted. So I set out to design a custom pair for her.
We started out with the basics - she wanted something warm and cozy, and in a material that was machine washable. My first thought was to use a wool/acrylic blend, but to really make it warm and cozy I thought it would be better to use a merino superwash. I think if budget was an issue I would have definitely chosen the wool/acrylic blend, but because Jo was willing to spend a bit more, I opted with Cascade 220 bulky superwash. It's so soft! :D I'm in love with this yarn :) Plus it came in the colours she was looking for :)
She told me she wanted a gray pair, with a teal stripe down the side with orange buttons on the top. She like the idea of having a cable go down the side with the stripe. The only issue I had with the cables is the fact that a leg calf would cause an uneven stretch along the length, which would distort the cable pattern more at the top (the cables would look more wider at the top). I still wanted to keep the idea of a cable pattern, so I designed it so the bottom half of the leg warmer stripe had a cable detail.
At first I was trying to knit the leg warmer as a round, changing colours without cutting the yarn (imagine the amount of weaving in the ends if I did!), but I found it was too loose between the stripe and the body of the leg warmer. This is when I made the split decision to start over and knit the body of the leg warmer and stripe separately, then kitchener-stitch it together. I found some reddish-orange buttons, and here's what I came up with:

We started out with the basics - she wanted something warm and cozy, and in a material that was machine washable. My first thought was to use a wool/acrylic blend, but to really make it warm and cozy I thought it would be better to use a merino superwash. I think if budget was an issue I would have definitely chosen the wool/acrylic blend, but because Jo was willing to spend a bit more, I opted with Cascade 220 bulky superwash. It's so soft! :D I'm in love with this yarn :) Plus it came in the colours she was looking for :)
She told me she wanted a gray pair, with a teal stripe down the side with orange buttons on the top. She like the idea of having a cable go down the side with the stripe. The only issue I had with the cables is the fact that a leg calf would cause an uneven stretch along the length, which would distort the cable pattern more at the top (the cables would look more wider at the top). I still wanted to keep the idea of a cable pattern, so I designed it so the bottom half of the leg warmer stripe had a cable detail.
At first I was trying to knit the leg warmer as a round, changing colours without cutting the yarn (imagine the amount of weaving in the ends if I did!), but I found it was too loose between the stripe and the body of the leg warmer. This is when I made the split decision to start over and knit the body of the leg warmer and stripe separately, then kitchener-stitch it together. I found some reddish-orange buttons, and here's what I came up with:

The pieces were knit from the top down. The buttons are in actual button holes - I had to knit an overage piece on the body of the leg warmers and attached the buttons there).
Jo loves them :) And they keep her calves nice and warm :)
November 2, 2013
S and her new hat
I finished S' hat :) It only took a lazy 3 days to finish the hat. I think it turned out well! Here she is rocking her new hat.


Mittens
Cast on 28 sts
Rounds 1-14: k2,p2 ribbing
Rounds 15-22: knit the same mock cable pattern as the hat
Thumb gusset:
Round 23: k1fb, k1fb, knit mock cable pattern
Round 24: k4, knit mock cable pattern
Round 25: k1fb, k2, k2fb knit mock cable pattern
Round 26: k6, knit mock cable pattern
Transfer 6 sts to a stitch holder, cast on 2 sts, then continue the mock cable pattern until about 1” from the top, then do 3 decreases (spaced out as evenly as possible) every other row until you get near the top, then k2tog until you’re left with 4-5 sts (I forgot how many).
For the thumb, pick up 4 sts from the top of the thumb hole, the continue to knit the 6 sts the off stitch holder. Knit in a round until desired length (I did 12 rows), then k2tog until there are 3 sts.
If you need the mitts bigger, the next size up would have to cast on 32sts (multiples of 4) and for the do 4 decreases spaced evenly.
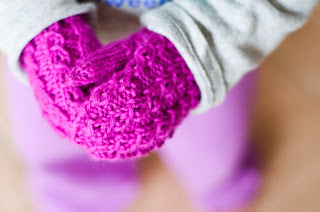
I absolutely love the mitts with the hat :) So happy with them!


In my last post I stated that I was worried about doing the decreases properly. The pattern was a bit confusing, but I managed to figure it out while knitting it. I think understanding the mock cable pattern and thinking a few rows ahead really helped me with the decreases. Basically you are merging two mock cables in the decrease locations - once the cables have merged, you perform the decrease stitches in the next mock cable rows. I contemplated not knitting the ear flaps and putting a pompom on top, but I really liked the idea of strings hanging from the side and wanted a hat that she could wear under her hooded coat.
After knitting the hat, I really wanted a pair of matching mitts. I don't know what it is about having a matching hat and mitts makes it more complete. Since there was not pattern available for mitts I thought I would just make it up myself. I took my knowledge from the mittens I've knit in the past and came up with a pattern. Here's the basics:
Cast on 28 sts
Rounds 1-14: k2,p2 ribbing
Rounds 15-22: knit the same mock cable pattern as the hat
Thumb gusset:
Round 23: k1fb, k1fb, knit mock cable pattern
Round 24: k4, knit mock cable pattern
Round 25: k1fb, k2, k2fb knit mock cable pattern
Round 26: k6, knit mock cable pattern
Transfer 6 sts to a stitch holder, cast on 2 sts, then continue the mock cable pattern until about 1” from the top, then do 3 decreases (spaced out as evenly as possible) every other row until you get near the top, then k2tog until you’re left with 4-5 sts (I forgot how many).
For the thumb, pick up 4 sts from the top of the thumb hole, the continue to knit the 6 sts the off stitch holder. Knit in a round until desired length (I did 12 rows), then k2tog until there are 3 sts.
If you need the mitts bigger, the next size up would have to cast on 32sts (multiples of 4) and for the do 4 decreases spaced evenly.

I absolutely love the mitts with the hat :) So happy with them!
October 22, 2013
After a long hiatus... I'm back (hopefully!)
I have to stop doing this - It's been a while huh?
I went through a bit of a transition the past several months. I lost my job back in February, and I went through a bit of a slump, so being motivated to do anything but look after S was a bit difficult for me. But after some time off, and a much-needed vacation out west (it's amazing what looking mountains for a couple of weeks can do to brighten your mood).
Even though I haven't touched this blog, it doesn't mean I haven't been knitting :) So I have a lot of catching up to do :)
So since it is getting colder, I am looking at knitting S a hat. I've decided on the Double Rib Toddler Hat pattern I found on Ravelry. I like the fact that it has ear flaps, so it will keep S' ears warm. I bought a skein of Cascade 220 in a pink/purple colour from my local yarn shop. Funny thing is, right after I bought that yarn I went to the grocery store, where I found a nice hat/mitten set and bought it for S :) 2 winter hats is not excessive, right?
I'm knitting it with the mock cable. This is what I've done so far (just started today):

I'm a little worried I can do the decreases at the top of the hat properly, as the pattern gets a bit confusing with the mock cable. I just hope I figure it out as I'm knitting it :)
I went through a bit of a transition the past several months. I lost my job back in February, and I went through a bit of a slump, so being motivated to do anything but look after S was a bit difficult for me. But after some time off, and a much-needed vacation out west (it's amazing what looking mountains for a couple of weeks can do to brighten your mood).
Even though I haven't touched this blog, it doesn't mean I haven't been knitting :) So I have a lot of catching up to do :)
So since it is getting colder, I am looking at knitting S a hat. I've decided on the Double Rib Toddler Hat pattern I found on Ravelry. I like the fact that it has ear flaps, so it will keep S' ears warm. I bought a skein of Cascade 220 in a pink/purple colour from my local yarn shop. Funny thing is, right after I bought that yarn I went to the grocery store, where I found a nice hat/mitten set and bought it for S :) 2 winter hats is not excessive, right?
I'm knitting it with the mock cable. This is what I've done so far (just started today):

I'm a little worried I can do the decreases at the top of the hat properly, as the pattern gets a bit confusing with the mock cable. I just hope I figure it out as I'm knitting it :)
January 23, 2013
Brrr it's cold out!
What an insanely cold day! -20C (much colder with the windchill). On days like these I'm glad I get to stay home and stay cozy with my baby S :D
The cold is definitely a great time to wear knits :) Which is why from now until Thursday (tomorrow) I'm offering 10% off my Etsy store :D
Use coupon code MINUS20.
Stay warm, and enjoy! :D
The cold is definitely a great time to wear knits :) Which is why from now until Thursday (tomorrow) I'm offering 10% off my Etsy store :D
Use coupon code MINUS20.
Stay warm, and enjoy! :D
January 11, 2013
My New Winter Hat
It's been getting cold up here, and I figure why not knit myself a new hat?
I had bought myself some Lion Brand Wool-Ease Thick & Quick from Michaels during their Boxing Day sale, mainly to make a Pixiebell Pixie hat for my sister for her birthday - she LOVED it :) I would post photos of it but it's a photo of me wearing it and I don't do it justice at all. It looks so much better on my sis :) I've been eying that pattern for a while and finally had the time to buy and knit it. I digress...
So back to my hat. I found this cute hat pattern on Ravelry that looked super easy and super quick to knit. It was all of the above :) I love quick knits! I had to modify the pattern because of my small head, and I wasn't using the right needles for the yarn I chose. The suggested needle size was 9US, I had 6.5US and I wasn't about to go out and buy new needles :P

The pattern called for tassels to be put on the back and on the sides of the hat, but I'm not a huge fan of tassels. Plus I ran out of yarn :S I chose to forgo the tassel on the back, and put braids on the sides. To make the braids thicker (because I ran out of yarn), I raided my yarn "odds-and-ends" stash and found this black and white merino yarn I used to make my friend mitts a few years ago.

I think the contrasting yarn colour in the braids looks fun :)
Ironically after I knit this hat, it hasn't been cold enough for me to wear it. It's going to be 11C here on the weekend. Huh?
I had bought myself some Lion Brand Wool-Ease Thick & Quick from Michaels during their Boxing Day sale, mainly to make a Pixiebell Pixie hat for my sister for her birthday - she LOVED it :) I would post photos of it but it's a photo of me wearing it and I don't do it justice at all. It looks so much better on my sis :) I've been eying that pattern for a while and finally had the time to buy and knit it. I digress...
So back to my hat. I found this cute hat pattern on Ravelry that looked super easy and super quick to knit. It was all of the above :) I love quick knits! I had to modify the pattern because of my small head, and I wasn't using the right needles for the yarn I chose. The suggested needle size was 9US, I had 6.5US and I wasn't about to go out and buy new needles :P
The pattern called for tassels to be put on the back and on the sides of the hat, but I'm not a huge fan of tassels. Plus I ran out of yarn :S I chose to forgo the tassel on the back, and put braids on the sides. To make the braids thicker (because I ran out of yarn), I raided my yarn "odds-and-ends" stash and found this black and white merino yarn I used to make my friend mitts a few years ago.
I think the contrasting yarn colour in the braids looks fun :)
Ironically after I knit this hat, it hasn't been cold enough for me to wear it. It's going to be 11C here on the weekend. Huh?
January 2, 2013
Keeping the iPad cozy
Happy New Year! :D
This is a MUCH delayed posting about my cable knit iPad case, but I figure with S sleeping and the hubby still at work I might as well get caught up blogging :) I'm behind on blogging about a few projects :S
Last year I received an email from a lady that had received one of my cable knit iPhone cases as a gift, and she was asking if I could knit her a matching case for her iPad. I was thinking about doing another side by side cable knit pattern similar to my iPhone case, but I felt it would look a little too simple for such a large surface area. I could have done just straight 4 columns of cables, but that didn't seem too interesting to me.
I'm a type of person that appreciates symmetry (sometimes a little too much. One freakish fact about me - when I chew my food I always have to make sure there are equal amounts of food on each side of my mouth. It just has to be symmetrical! LoL). I started to come up with an idea of having the two inner cable columns larger, with the outer cable columns smaller. And this is what I came up with:

Pattern is available to purchase by clicking the "buy now" button below (sold through Ravelry and is a direct file download)

This is a MUCH delayed posting about my cable knit iPad case, but I figure with S sleeping and the hubby still at work I might as well get caught up blogging :) I'm behind on blogging about a few projects :S
Last year I received an email from a lady that had received one of my cable knit iPhone cases as a gift, and she was asking if I could knit her a matching case for her iPad. I was thinking about doing another side by side cable knit pattern similar to my iPhone case, but I felt it would look a little too simple for such a large surface area. I could have done just straight 4 columns of cables, but that didn't seem too interesting to me.
I'm a type of person that appreciates symmetry (sometimes a little too much. One freakish fact about me - when I chew my food I always have to make sure there are equal amounts of food on each side of my mouth. It just has to be symmetrical! LoL). I started to come up with an idea of having the two inner cable columns larger, with the outer cable columns smaller. And this is what I came up with:
Pattern is available to purchase by clicking the "buy now" button below (sold through Ravelry and is a direct file download)
December 31, 2012
As 2012 comes to and end...
What a truly amazing year it has been, both in knitting and in life.
Firstly, the obvious, I welcomed a new baby girl into my family. She has been such a blessing, and it's been so much fun knitting little creations for her. I love knitting for babies - the projects are so quick! Haha :). Here's a picture of a sweater I knit S for her Xmas present - the pattern (Neighborly) can be found on Ravelry. It was inspired by a Alicia Paulson project I saw on her Ravelry site:

I used Malabrigo Merino Worsted in Frost Gray I purchased from Valley Yarn. It was my first time knitting with a Malabrigo yarn. It's so incredibly soft and beautiful to knit with. I will definitely knit with it again!
My store has definitely picked up, in part because I began to sell my patterns online. I've been crazy busy the past few days with custom orders, but it's been fun making creations for my wonderful customers.
Also another big change - notice the website address? That's right! www.kareknits.com went live as of last night :) can't think of a better way to end this year.
Here's wishing everyone a happy and prosperous 2013 :)
Firstly, the obvious, I welcomed a new baby girl into my family. She has been such a blessing, and it's been so much fun knitting little creations for her. I love knitting for babies - the projects are so quick! Haha :). Here's a picture of a sweater I knit S for her Xmas present - the pattern (Neighborly) can be found on Ravelry. It was inspired by a Alicia Paulson project I saw on her Ravelry site:
I used Malabrigo Merino Worsted in Frost Gray I purchased from Valley Yarn. It was my first time knitting with a Malabrigo yarn. It's so incredibly soft and beautiful to knit with. I will definitely knit with it again!
My store has definitely picked up, in part because I began to sell my patterns online. I've been crazy busy the past few days with custom orders, but it's been fun making creations for my wonderful customers.
Also another big change - notice the website address? That's right! www.kareknits.com went live as of last night :) can't think of a better way to end this year.
Here's wishing everyone a happy and prosperous 2013 :)
November 20, 2012
Winter Pompom hat
With the winter coming soon who doesn't need a warm hat, especially if you live up in the Great White North like I do!
My friend Jenn has the same problem I have when I comes to buying hats - we both have small heads. Sometimes this means shopping in the kids section sometimes. How embarrassing would it be to bump into a kid wearing the same hat as you? Haha :) Jenn has been hunting for a cable knit hat with a pompom for a while now. She actually asked me to make one for her last year, but with my pregnancy and prepping for S' arrival I just didn't have time. This year she asked me again, and I finally delivered :)
I went my favourite pattern site Ravelry to find a cable knit hat that would allow me to knit different sizes. But even if I couldn't find one I would have just bought a lower gauge yarn and used smaller needles and followed the pattern as is. I found a nice pattern called the Gingerbread Hat, which I liked because it had some additional design elements in addition to the cables.
I knit extra rows of the ribbing brim so that Jenn could fold it up - I thought the hat would look better this way, and I think I does :) I knit an additional 12 rows than what the pattern called for. I found the pattern to be pretty easy to knit - the first couple of rows I had to keep my eye on the pattern, but once I figured it out it was smooth sailing :)
I topped the hat off with a pompom made out of the remaining yarn. I found this video on YouTube that showed me how to make it. I crapped up the first one, and had my sister help me with my second attempt :D Note to self - always try a new technique with scrap yarn that you're not going to be using for your project - I almost ran out of yarn making the second one!
And voila.. Jenn's new hat :)


My friend Jenn has the same problem I have when I comes to buying hats - we both have small heads. Sometimes this means shopping in the kids section sometimes. How embarrassing would it be to bump into a kid wearing the same hat as you? Haha :) Jenn has been hunting for a cable knit hat with a pompom for a while now. She actually asked me to make one for her last year, but with my pregnancy and prepping for S' arrival I just didn't have time. This year she asked me again, and I finally delivered :)
I went my favourite pattern site Ravelry to find a cable knit hat that would allow me to knit different sizes. But even if I couldn't find one I would have just bought a lower gauge yarn and used smaller needles and followed the pattern as is. I found a nice pattern called the Gingerbread Hat, which I liked because it had some additional design elements in addition to the cables.
I knit extra rows of the ribbing brim so that Jenn could fold it up - I thought the hat would look better this way, and I think I does :) I knit an additional 12 rows than what the pattern called for. I found the pattern to be pretty easy to knit - the first couple of rows I had to keep my eye on the pattern, but once I figured it out it was smooth sailing :)
I topped the hat off with a pompom made out of the remaining yarn. I found this video on YouTube that showed me how to make it. I crapped up the first one, and had my sister help me with my second attempt :D Note to self - always try a new technique with scrap yarn that you're not going to be using for your project - I almost ran out of yarn making the second one!
And voila.. Jenn's new hat :)
November 5, 2012
Arm/Wrist Warmer Fun
I've gotten back to my roots - knitting wrist/arm warmers :) I went through this phase early in my pattern knitting career making up patterns for wrist warmers. But of course I made up the pattern as I went, and I didn't write it down (well there are notes, but it's all short-handed jibberish with dots, squiggly lines and numbers - a language I think I could only understand).
My sis and her husband ventured downtown one afternoon and happened to stroll into this yarn store. Now, my sister does not knit (she sews... we make a pretty good crafting mega team!), but she strolled in because she wanted to get me a business card just in case I wanted to go some time. While she was there she saw these arm warmers that looked pretty cool - it was a long cable knit arm warmer with a cable pattern. What was so interesting about these arm warmers was the cable wrapped around the thumb hole. She asked me if I could knit something similar for her. I consulted my cable knitting bible (LoL) and this is what I came up with:


I think they turned out pretty well :) I used Martha Stewart 100% merino wool to make her wrist warmers. I love knitting with merino - the structure of wool but super soft. My sis loved the arm warmers - yay! :D
Pattern is available to purchase by clicking the "buy now" button below (sold through Ravelry and is a direct file download)
My sis and her husband ventured downtown one afternoon and happened to stroll into this yarn store. Now, my sister does not knit (she sews... we make a pretty good crafting mega team!), but she strolled in because she wanted to get me a business card just in case I wanted to go some time. While she was there she saw these arm warmers that looked pretty cool - it was a long cable knit arm warmer with a cable pattern. What was so interesting about these arm warmers was the cable wrapped around the thumb hole. She asked me if I could knit something similar for her. I consulted my cable knitting bible (LoL) and this is what I came up with:


I think they turned out pretty well :) I used Martha Stewart 100% merino wool to make her wrist warmers. I love knitting with merino - the structure of wool but super soft. My sis loved the arm warmers - yay! :D
Pattern is available to purchase by clicking the "buy now" button below (sold through Ravelry and is a direct file download)
October 6, 2012
Finally! Knitting for S
Since I last posted (more than 8 months ago!) I became a mom :D I gave birth to a lovely baby girl in February, and this little munchkin has taken over my heart. I dove into a world of baby songs, baby games, baby talk, cloth diapering, shopping on baby deal sites (which is highly addictive!).. everything baby! It left little time for anything else - like knitting!
After months and months of learning how to be a mom, I think I finally got the hang of it (sort of). This meant I could finally knit again! Hooray! :D I realized about a month ago I haven't really knit anything for S. I did knit her a hat before she was born, but it was too big for her, and by the time she was able to fit into it, it was summer. Who wants to wear a wool hat in the summer? And since the colder weather was slowly sneaking in on us, I decided to knit her something to keep her warm. I scoured Ravelry to find a cute little sleeveless cardi I could knit her.
I used Estelle Cloud Cotton 100% organic cotton (2 skeins) that I had bought last year when I was attempting to make something for my friend's twin girls. I had bought an off-white colour in anticipation for S (at that point I didn't know what I was having so I had to choose a gender neutral colour). This pattern was quite easy to follow, but like any lace pattern, if you screw up it's horrible!

I also opted to finish off the edges with an i-cord trim. This was my first time making/using an i-cord and it was a learning experience. I ended up making the i-cords too long, so the edges of the garment were wavy. And cotton does not block well, if at all - which is one of the reasons why I don't particularly like knitting with cotton. But I must admit, besides the waviness, I do like the i-cord embellished edges.


I knit the 12 month size, and in knitting it for an almost 8 month old, it sits pretty big on her. But with all kids clothing, it's always better to size up. S does like wearing it... but I think she enjoys chewing on the buttons even more :D

After months and months of learning how to be a mom, I think I finally got the hang of it (sort of). This meant I could finally knit again! Hooray! :D I realized about a month ago I haven't really knit anything for S. I did knit her a hat before she was born, but it was too big for her, and by the time she was able to fit into it, it was summer. Who wants to wear a wool hat in the summer? And since the colder weather was slowly sneaking in on us, I decided to knit her something to keep her warm. I scoured Ravelry to find a cute little sleeveless cardi I could knit her.
I used Estelle Cloud Cotton 100% organic cotton (2 skeins) that I had bought last year when I was attempting to make something for my friend's twin girls. I had bought an off-white colour in anticipation for S (at that point I didn't know what I was having so I had to choose a gender neutral colour). This pattern was quite easy to follow, but like any lace pattern, if you screw up it's horrible!

I also opted to finish off the edges with an i-cord trim. This was my first time making/using an i-cord and it was a learning experience. I ended up making the i-cords too long, so the edges of the garment were wavy. And cotton does not block well, if at all - which is one of the reasons why I don't particularly like knitting with cotton. But I must admit, besides the waviness, I do like the i-cord embellished edges.


I knit the 12 month size, and in knitting it for an almost 8 month old, it sits pretty big on her. But with all kids clothing, it's always better to size up. S does like wearing it... but I think she enjoys chewing on the buttons even more :D

January 18, 2012
My iPhone Case
Like all of us avid knitters we always have a "left over" yarn stash that we keep just in case there is something small that we knit. My bin was getting quite large, considering I was also knitting for my Etsy store. So what to do with all my left over stash?
A few months ago I decided to experiment and knit a nice cable knit phone case. The reason being is that it didn't take too much yarn to make one, and they're quite quick to knit up. I could have knit a plain stockinette stitch without the cable, but I find if you have a simple plain yarn it doesn't look as good (variegated or self-striping yarn produces wonderful cases with just a stockinette stitch. I also wanted to make this case seamless because I just hate seaming! The less seaming I do at the end the better! Now I'm the type of knitter that likes to just pick up needles and some yarn and knit, coming up with the pattern as I go. What I came up with was this :)


This has become a best seller at my store :)
I've also been approached with the pattern - it took me a while to get it out because it was in my head :)
Pattern is available to purchase by clicking the "buy now" button below (sold through Ravelry and is a direct file download)
A few months ago I decided to experiment and knit a nice cable knit phone case. The reason being is that it didn't take too much yarn to make one, and they're quite quick to knit up. I could have knit a plain stockinette stitch without the cable, but I find if you have a simple plain yarn it doesn't look as good (variegated or self-striping yarn produces wonderful cases with just a stockinette stitch. I also wanted to make this case seamless because I just hate seaming! The less seaming I do at the end the better! Now I'm the type of knitter that likes to just pick up needles and some yarn and knit, coming up with the pattern as I go. What I came up with was this :)


This has become a best seller at my store :)
I've also been approached with the pattern - it took me a while to get it out because it was in my head :)
Pattern is available to purchase by clicking the "buy now" button below (sold through Ravelry and is a direct file download)
November 12, 2011
Plus One
So, it's been awhile huh? But my absence from my blog is not without merit :) Some time after I got back from my vacation in April I found out I was expecting a little one :D That's right - my family is about to add a plus one!
Unfortunately one of the side effects of pregnancy is baby brain - my brain has been absolute mush over the past few months. Early on in my pregnancy baby brain really took a toll on me - so much so that I could not knit for the life of me! My friend had twins back in August and I attempted to knit them gifts 3 times (the 3rd time was a charm!). It was absolutely ridiculous! I found I couldn't follow patterns properly, and I kept making mistakes! It was horrible! But since then I've gotten my knitting groove back and I'm well on my way :D That is, until the carpel tunnel sets it - I'm not looking forward to that!
Over the past few months I was able to knit my little one a baby blanket, and as I mentioned previously, some baby gifts :) My sister-in-law also had a little baby boy in August and I really wanted to knit him a hat to keep his little noggin warm during the winter months. I found this cute Aviatrix hat pattern on Ravelry and fell in love with it. The pattern looks hard, but once I got going it was actually not too bad! I used Debbie Bliss Cashmerino yarn.

 I loved knitting this hat so much I made it for my friend's twin girls. And I also plan to knit one for my little one too :D
Unfortunately one of the side effects of pregnancy is baby brain - my brain has been absolute mush over the past few months. Early on in my pregnancy baby brain really took a toll on me - so much so that I could not knit for the life of me! My friend had twins back in August and I attempted to knit them gifts 3 times (the 3rd time was a charm!). It was absolutely ridiculous! I found I couldn't follow patterns properly, and I kept making mistakes! It was horrible! But since then I've gotten my knitting groove back and I'm well on my way :D That is, until the carpel tunnel sets it - I'm not looking forward to that!
Over the past few months I was able to knit my little one a baby blanket, and as I mentioned previously, some baby gifts :) My sister-in-law also had a little baby boy in August and I really wanted to knit him a hat to keep his little noggin warm during the winter months. I found this cute Aviatrix hat pattern on Ravelry and fell in love with it. The pattern looks hard, but once I got going it was actually not too bad! I used Debbie Bliss Cashmerino yarn.


March 31, 2011
Knitting on a Plane
As the hubby and I are slowly preparing to embark on our next adventure, of course I have to wonder - can I take my knitting with me on the plane? Knitting is a perfect time-killer for me and it makes definitely makes time fly by faster. But the biggest question is - can I take knitting needles on a plane?
I've been doing some research, and on the TSA website, it says knitting needles are allowed on flights, but cutters are not allowed. But it fails to describe of what type of needles are allowed (circulars, metal vs. bamboo vs. plastic...). And this applies to American destinations only.
Now this is purely based on my own personal experience, and it may depend on which airport you fly out of, which airline you fly with or where you are flying to. Or even which security guard you get. I usually fly out of Toronto Pearson and I've never had a problem with my wood/bamboo 3/4mm DPNs. I've also flown out of various American cities, Paris and Lima with my needles in tow without any issues. But this time around, I want to take the socks I've been working on with me on my flight. Because I've been knitting using the magic-loop method, the circulars I've been using are quite long, and they're metal.
I've read a few websites and I haven't heard anyone having major issues with circulars. Some say keep the circulars to less than 30" and make sure they are not metal. Others say to bring with you a self addressed envelope with postage so that you can ship your project back to yourself just in case you get turned away from security. And always have your project started before your trip!
So now I'm debating whether I should bring my long-ass 2mm circulars - if they get confiscated I don't know what I'll do!
... I'll risk it. Stay tuned for what happens :D
I've been doing some research, and on the TSA website, it says knitting needles are allowed on flights, but cutters are not allowed. But it fails to describe of what type of needles are allowed (circulars, metal vs. bamboo vs. plastic...). And this applies to American destinations only.
Now this is purely based on my own personal experience, and it may depend on which airport you fly out of, which airline you fly with or where you are flying to. Or even which security guard you get. I usually fly out of Toronto Pearson and I've never had a problem with my wood/bamboo 3/4mm DPNs. I've also flown out of various American cities, Paris and Lima with my needles in tow without any issues. But this time around, I want to take the socks I've been working on with me on my flight. Because I've been knitting using the magic-loop method, the circulars I've been using are quite long, and they're metal.
I've read a few websites and I haven't heard anyone having major issues with circulars. Some say keep the circulars to less than 30" and make sure they are not metal. Others say to bring with you a self addressed envelope with postage so that you can ship your project back to yourself just in case you get turned away from security. And always have your project started before your trip!
So now I'm debating whether I should bring my long-ass 2mm circulars - if they get confiscated I don't know what I'll do!
... I'll risk it. Stay tuned for what happens :D
March 10, 2011
TtV-ing
I finally got a chance to give TtV photography a go!
I had the hubby build a contraption that blocked the light between my DSLR lens and the TLR viewfinder. I was going to build it, being the engineer that I am, but I know how much my hubs likes building stuff - so I had him build it :) The viewfinder is located at the top of the camrea, so I have to shoot downwards with my DSLR, meaning he had to build a tunnel-like contraption up from the viewfinder. And this is what he came up with:
 He built it out of some black foam board he got from work. Right now it's held together with elastics - a bit dodgy looking but it serves its' purpose! He was going to tape it up, but if he did that I wouldn't be able to remove the camera. I guess I'm not planning to the TLR for anything else huh? I wonder if I can make a collapsable one so I can take it with me on trips. hm... :)
Here are a few TtV photos I took:


I'm loving it so far! I can't wait to go outside and start taking photos :D
I had the hubby build a contraption that blocked the light between my DSLR lens and the TLR viewfinder. I was going to build it, being the engineer that I am, but I know how much my hubs likes building stuff - so I had him build it :) The viewfinder is located at the top of the camrea, so I have to shoot downwards with my DSLR, meaning he had to build a tunnel-like contraption up from the viewfinder. And this is what he came up with:

Here are a few TtV photos I took:


I'm loving it so far! I can't wait to go outside and start taking photos :D
March 6, 2011
Hobby Hopping
In my last post, I mentioned that you need to try new things in order to find hobbies that you enjoy. This week has been that sort of week :) I've begun my adventure into 3 new hobbies that all have the potential to become my next big obsession!
TtV Photography
I did mentioned TtV (through-the-viewfinder) photography in my last post - I finally got the TLR (Twin Lens Reflex) camera. Introducing my new baby: the Argus Argoflex Seventy-Five.
 *loves* I can't wait to give TtV a go!
Crocheting
My crocheting adventure began on Wednesday night, when I attempted to learn how to crochet via YouTube vids and how-to websites. It might have been the yarn was I was using, or my lack of understanding of the instructions but it did not go well at all! That's when I threw up my arms and said "I give up", tossed the needles aside and vegged on the couch.
On Thursday night I had a wicked case of insomnia. I went to bed around 12am, woke up at 3am and couldn't go back to sleep. After tossing and turning for 2 hours (my poor hubby! I'm sure I woke him up a few times) I finally got out of bed and headed downstairs and decided to give crocheting another shot. This time I was successful :) I got the basics stitch I think - I've been just making small squares with my left-over yarn from my wrist warmers. I figure I can stitch the squares together later and make a blanket or something!
Cake Decorating
My friends Steph and Jenn approached me last week about taking a cake decorating class with them. I've taken a cupcake decorating class before at a local grocery store, and I was horrible at it! But I thought what the heck - the class was 50% off and it would be a great to do something fun with my friends :) Here's the thing though - although the class is 50%, all the materials that are needed for the class are crazy expensive! Luckily Ed took the class before and has a crapload of cake decorating stuff, so she's letting me borrow her tools :) I figure if I end up liking it I'll buy my own stuff.
So the first class we were told to bring 6 cookies to decorate for our first class. Saturday night Jenn and Steph both came over to have a mini baking party. We made a simple Empire cookie (it's a cross between a shortbread and sugar cookie). We decided to make big cookies because we thought the more decorating surface area, the better (makes sense right?). I'm guessing the lack of sleep from Thursday night was still lingering because I ended up throwing enough butter into the mixing bowl for 2 batches of cookies instead of 1. *slaps forehead* so we ended up making like 30 big cookies! LoL!
We get to our class today and most of the time was us just watching the instructor. It was only the last 15 minutes where we were decorating - so in reality we only really needed to make 3 cookies each because that's all we had time to decorate! And on top of that, our instructor took one look at our cookies and said "omg those are huge!" - meaning we didn't need to make huge-ass cookies. LoL oh too funny!
So here's one of my decorated cookies. meh... it's not very good... we'll see how it goes next week! haha

TtV Photography
I did mentioned TtV (through-the-viewfinder) photography in my last post - I finally got the TLR (Twin Lens Reflex) camera. Introducing my new baby: the Argus Argoflex Seventy-Five.

Crocheting
My crocheting adventure began on Wednesday night, when I attempted to learn how to crochet via YouTube vids and how-to websites. It might have been the yarn was I was using, or my lack of understanding of the instructions but it did not go well at all! That's when I threw up my arms and said "I give up", tossed the needles aside and vegged on the couch.
On Thursday night I had a wicked case of insomnia. I went to bed around 12am, woke up at 3am and couldn't go back to sleep. After tossing and turning for 2 hours (my poor hubby! I'm sure I woke him up a few times) I finally got out of bed and headed downstairs and decided to give crocheting another shot. This time I was successful :) I got the basics stitch I think - I've been just making small squares with my left-over yarn from my wrist warmers. I figure I can stitch the squares together later and make a blanket or something!
Cake Decorating
My friends Steph and Jenn approached me last week about taking a cake decorating class with them. I've taken a cupcake decorating class before at a local grocery store, and I was horrible at it! But I thought what the heck - the class was 50% off and it would be a great to do something fun with my friends :) Here's the thing though - although the class is 50%, all the materials that are needed for the class are crazy expensive! Luckily Ed took the class before and has a crapload of cake decorating stuff, so she's letting me borrow her tools :) I figure if I end up liking it I'll buy my own stuff.
So the first class we were told to bring 6 cookies to decorate for our first class. Saturday night Jenn and Steph both came over to have a mini baking party. We made a simple Empire cookie (it's a cross between a shortbread and sugar cookie). We decided to make big cookies because we thought the more decorating surface area, the better (makes sense right?). I'm guessing the lack of sleep from Thursday night was still lingering because I ended up throwing enough butter into the mixing bowl for 2 batches of cookies instead of 1. *slaps forehead* so we ended up making like 30 big cookies! LoL!
We get to our class today and most of the time was us just watching the instructor. It was only the last 15 minutes where we were decorating - so in reality we only really needed to make 3 cookies each because that's all we had time to decorate! And on top of that, our instructor took one look at our cookies and said "omg those are huge!" - meaning we didn't need to make huge-ass cookies. LoL oh too funny!
So here's one of my decorated cookies. meh... it's not very good... we'll see how it goes next week! haha

February 26, 2011
One Year...
It has been one year since we lost our beloved family dog Pepper. Some days I still can't believe he's gone. It still makes me really sad knowing he's no long with us, but so glad that I got to spend 13 wonderful years getting to know and love the cutest Cavalier King Charles Spaniel I've ever laid eyes on. He was the most friendliest and loving dog - we often joked around that Pepper made the world's worst guard dog, and would probably welcome intruders instead of deter them. He was also born on Valentines day, which is so suiting for such a loveable dog.

February 20, 2011
Apparently I'm Interesting
Thank goodness for long weekends! Finally one has come around :) Ever since the new year started the weekends have felt short, and I can only assume it is because they have all been so busy! With family functions for Chinese New Year, seeing friends, celebrating the hubby's birthday and baby showers, I am just tired and I want to veg out and spend some time on me - and that means catching up on my blog!
 So for Valentines day I got roses :) There's a bit of a story with these roses and it does invovle making fun of my hubby. Before I got married I remember having a conversation with my dad on Valentines day. On that particular Valentines day, Jimmy had gotten me a beautiful bouquet of roses from a florist. My dad laughed and told me to wait until we got married - married guys buy their flowers from a grocery story. Apparently that day my dad went out to a local grocery store to buy my mom flowers and was greeted by a line of other married men buying their wives flowers. So flash forward to present day - guess where my flowers were from? :D But you know what? Flowers are flowers, and they were beautiful!
 So yesterday my friends and I ventured downtown to check out the Canadian International Auto Show at the Metro Toronto Convention Center. I really wanted to go because I wanted to check out a car that I had worked on back when I worked in the automotive industry. I had worked on some of the parts on the interior dash and was really eager to see how it turned out :) And the Auto Show was a great opportunity to take my Nikon baby out. My friends Ed and Jay recently started a small little photography club and this was our little photography outting. I have to admit, I wasn't quite inspired yesterday to take photos - maybe it was the crowd :s But regardless, I think I got some pretty good shots. I especially enjoyed looking at the vintage cars :) Man I'm on a vintage kick recently! A few days ago I just bought myself a vintage Twin Lens Reflex (TLR) camera - more about that on that another day!! :D
So the other day I was talking with my coworker and she called me an "interesting person" because I appear to have so many hobbies that I am involved with. When she said this it made me reflect on how far I've come in terms of developing interests that I enjoy and is actually good at. A few years ago I really didn't have any hobbies or interests - and this made me extremely sad. I knew I had travelling as a hobby, but it wasn't something I could do all the time (or afford - especially to the places I like to travel to!) I struggled to understand why it didn't appear as if I was good at anything. Fast forward a few years and I can't get enough of my hobbies :) I still travel - we still go on at least one big adventure/trip a year, but now I have photography to compliment the travel, and the knitting to pass the remaining 11 months out of the year I'm not travelling :) The key is to try different things to find out what you enjoy. And I do credit Ed for helping me expand on my interests. It's definitely fun when you have someone to share your interests with!

 So for Valentines day I got roses :) There's a bit of a story with these roses and it does invovle making fun of my hubby. Before I got married I remember having a conversation with my dad on Valentines day. On that particular Valentines day, Jimmy had gotten me a beautiful bouquet of roses from a florist. My dad laughed and told me to wait until we got married - married guys buy their flowers from a grocery story. Apparently that day my dad went out to a local grocery store to buy my mom flowers and was greeted by a line of other married men buying their wives flowers. So flash forward to present day - guess where my flowers were from? :D But you know what? Flowers are flowers, and they were beautiful!
So the other day I was talking with my coworker and she called me an "interesting person" because I appear to have so many hobbies that I am involved with. When she said this it made me reflect on how far I've come in terms of developing interests that I enjoy and is actually good at. A few years ago I really didn't have any hobbies or interests - and this made me extremely sad. I knew I had travelling as a hobby, but it wasn't something I could do all the time (or afford - especially to the places I like to travel to!) I struggled to understand why it didn't appear as if I was good at anything. Fast forward a few years and I can't get enough of my hobbies :) I still travel - we still go on at least one big adventure/trip a year, but now I have photography to compliment the travel, and the knitting to pass the remaining 11 months out of the year I'm not travelling :) The key is to try different things to find out what you enjoy. And I do credit Ed for helping me expand on my interests. It's definitely fun when you have someone to share your interests with!
My Etsy have still been lagging lately :( But now I have time to do what I have been missing most - knitting socks! Boy I'm VERY rusty! Im knitting a pair of socks that have a bit of a lace pattern and I keep screwing it up! And because I'm knitting witht the magic loop method the screw-ups took me forever to fix! I think I've restarted these pair of socks 3 times already :S But I'm getting the hang of it again, and I have to count my stitches after each lace row just to make sure I didn't screw up! So here's my progress so far... :D

February 9, 2011
Scaring Myself Silly
Happy Chinese New Year everyone! If you thought you gained weight during Christmas, try being Chinese during CNY! Oh boy!
It's kinda late right now, but I'm waiting for the hubby to get back home and believe it or not, I'm actually tired of knitting right now! haha! I spent the night knitting a replacement pair of mitts I gave to my best friend Ri as a gift :) She came over on the Sunday after we took a trip downtown with my sister to try on the wedding dress she bought last October (yes, my baby sis is getting married!!!).
The hubby was out celebrating his upcoming birthday with his coworkers, so I had the evening to myself. So what did I do? I watched ghost hunter shows all night and scared myself shitless :S I don't think a lot of people know this about me, but I LOVE watching ghost hunter shows. I can't watch horror movies, but something about finding evidence of paranormal activity is fascinating to me. It must appeal to the science geek in me I guess :) So my absolutely most favorite ghost hunter show is Ghost Adventures - they don't show it in Canada so I have to find other ways to watch the show. After watching that show, all the other ghost hunters shows seem too tame and drab. Anyway, I watched 4 episodes in a row - I don't recommend doing that if you're alone at home, at night... yeah... LoL! S-M-R-T!
.... now to make my way upstairs to my room... in the dark.... lovely!
It's kinda late right now, but I'm waiting for the hubby to get back home and believe it or not, I'm actually tired of knitting right now! haha! I spent the night knitting a replacement pair of mitts I gave to my best friend Ri as a gift :) She came over on the Sunday after we took a trip downtown with my sister to try on the wedding dress she bought last October (yes, my baby sis is getting married!!!).
The hubby was out celebrating his upcoming birthday with his coworkers, so I had the evening to myself. So what did I do? I watched ghost hunter shows all night and scared myself shitless :S I don't think a lot of people know this about me, but I LOVE watching ghost hunter shows. I can't watch horror movies, but something about finding evidence of paranormal activity is fascinating to me. It must appeal to the science geek in me I guess :) So my absolutely most favorite ghost hunter show is Ghost Adventures - they don't show it in Canada so I have to find other ways to watch the show. After watching that show, all the other ghost hunters shows seem too tame and drab. Anyway, I watched 4 episodes in a row - I don't recommend doing that if you're alone at home, at night... yeah... LoL! S-M-R-T!
.... now to make my way upstairs to my room... in the dark.... lovely!
January 23, 2011
My Bowtie Scarflette
As I mentioned in my previous post I've been working on some new items for my Etsy store. Sales have been slumping quite a bit, which makes me a bit sad, but oh well, that's the nature of doing business - you have busy times and you have slow times. But it has given me a chance to try out something new.
This idea all started a few months ago when I went shopping with my sis and Ed. We went to Anthropolgie because for my birthday they had sent me a coupon that gave me 15% off my purchase. While there I came across a bowtie scaflette that had a cotton liner sewed into it. I thought - that's brilliant! Especially for wool items, because I know a lot of people (including myself) have wool sensitivies.
I knew I didn't want to sew in the lining by hand. My hand sewing skills are not quite up to par. I actually don't think I have the patience for hand sewing. I find that when I first start off, my stitches look even and alright, but as I keep going my stitches get bigger and bigger, and then it just looks sloppy. Yes I know, I'm impatient (couldn't you tell by my other posts? LoL). I began to read up on how to sew items with a sewing machine to a knitted item and found out it was not so easy. Knitted items stretch, so you have to be super careful when feeding it in through the machine.
So a couple of weeks ago I had time to knit up a bowtie scarf - I got the pattern off Ravelry and it's quite simple really. I bought some cotton material with a nice print, cut it to size, then headed over to my parents house to use their sewing machine. I read on a website to use a zig-zag stitch, which I started out using, but for some reason the machine would miss some stitches and some of them turned out to be just a straight stitch. I had the cotton material on top of the knitted material, and I think the thread wasn't catching the knitted material at the bottom. After about 4 cycles of sewing and ripping, I decided to go to a straight stitch - I finally had it!
Just make sure you use a ton of pins to keep the everything together - this will also help prevent the knitted material from stretching too much. And go slow - it's not a race! :D
My prototype turned out pretty good, but the final product turned out better. Before I had a straight rectangular piece, but I found when I put the scarf on you could see the corners of the material sticking out. So I ended up chamfering the corners.
And here's my final product!


It's now for sale @ my Etsy Store
This idea all started a few months ago when I went shopping with my sis and Ed. We went to Anthropolgie because for my birthday they had sent me a coupon that gave me 15% off my purchase. While there I came across a bowtie scaflette that had a cotton liner sewed into it. I thought - that's brilliant! Especially for wool items, because I know a lot of people (including myself) have wool sensitivies.
I knew I didn't want to sew in the lining by hand. My hand sewing skills are not quite up to par. I actually don't think I have the patience for hand sewing. I find that when I first start off, my stitches look even and alright, but as I keep going my stitches get bigger and bigger, and then it just looks sloppy. Yes I know, I'm impatient (couldn't you tell by my other posts? LoL). I began to read up on how to sew items with a sewing machine to a knitted item and found out it was not so easy. Knitted items stretch, so you have to be super careful when feeding it in through the machine.
So a couple of weeks ago I had time to knit up a bowtie scarf - I got the pattern off Ravelry and it's quite simple really. I bought some cotton material with a nice print, cut it to size, then headed over to my parents house to use their sewing machine. I read on a website to use a zig-zag stitch, which I started out using, but for some reason the machine would miss some stitches and some of them turned out to be just a straight stitch. I had the cotton material on top of the knitted material, and I think the thread wasn't catching the knitted material at the bottom. After about 4 cycles of sewing and ripping, I decided to go to a straight stitch - I finally had it!
Just make sure you use a ton of pins to keep the everything together - this will also help prevent the knitted material from stretching too much. And go slow - it's not a race! :D
My prototype turned out pretty good, but the final product turned out better. Before I had a straight rectangular piece, but I found when I put the scarf on you could see the corners of the material sticking out. So I ended up chamfering the corners.
And here's my final product!


It's now for sale @ my Etsy Store
Subscribe to:
Posts (Atom)