Showing posts with label How-To. Show all posts

January 23, 2011

My Bowtie Scarflette

As I mentioned in my previous post I've been working on some new items for my Etsy store.  Sales have been slumping quite a bit, which makes me a bit sad, but oh well, that's the nature of doing business - you have busy times and you have slow times.  But it has given me a chance to try out something new.

This idea all started a few months ago when I went shopping with my sis and Ed.  We went to Anthropolgie because for my birthday they had sent me a coupon that gave me 15% off my purchase.  While there I came across a bowtie scaflette that had a cotton liner sewed into it.  I thought - that's brilliant!  Especially for wool items, because I know a lot of people (including myself) have wool sensitivies.

I knew I didn't want to sew in the lining by hand.  My hand sewing skills are not quite up to par.  I actually don't think I have the patience for hand sewing.  I find that when I first start off, my stitches look even and alright, but as I keep going my stitches get bigger and bigger, and then it just looks sloppy.  Yes I know, I'm impatient (couldn't you tell by my other posts? LoL).  I began to read up on how to sew items with a sewing machine to a knitted item and found out it was not so easy.  Knitted items stretch, so you have to be super careful when feeding it in through the machine. 

So a couple of weeks ago I had time to knit up a bowtie scarf - I got the pattern off Ravelry and it's quite simple really.  I bought some cotton material with a nice print, cut it to size, then headed over to my parents house to use their sewing machine.  I read on a website to use a zig-zag stitch, which I started out using, but for some reason the machine would miss some stitches and some of them turned out to be just a straight stitch.  I had the cotton material on top of the knitted material, and I think the thread wasn't catching the knitted material at the bottom.  After about 4 cycles of sewing and  ripping, I decided to go to a straight stitch - I finally had it! 

Just make sure you use a ton of pins to keep the everything together - this will also help prevent the knitted material from stretching too much.  And go slow - it's not a race! :D

My prototype turned out pretty good, but the final product turned out better.  Before I had a straight rectangular piece, but I found when I put the scarf on you could see the corners of the material sticking out.  So I ended up chamfering the corners. 

And here's my final product!


It's now for sale @ my Etsy Store

December 27, 2010

Thrummed Mittens

Happy Holidays everyone!  It's been a while since I blogged!  I've been knitting up a storm the past month - knitting for both my personal gifts and for my Etsy store.  I was really cutting it close!  I think I finished knitting my last x'mas gift on the 23rd :S  I was so frazzled with knitting and planning this blog post on thrummed mittens, I've forgotten to take photos of most of the items I as gifts.  I made cowl neck scarves for my BFF Rita and my sister-in-law using hand dyed yarn I purchased off cowgirlknits on Etsy, a hooded scarf for my sister (I ended up making up my own pattern - I might have to fix it though, the hood might be too small) and 3 pairs for thrummed mitts for my mom, Ed and my close friend Flo.  To make matters more stressful, X'mas dinner was at our house again for the second year and a row, and the pressure was on to cook a tastey turkey (it was delicious last year, so I had something to live up to!).  Thank God I was given Friday off :D


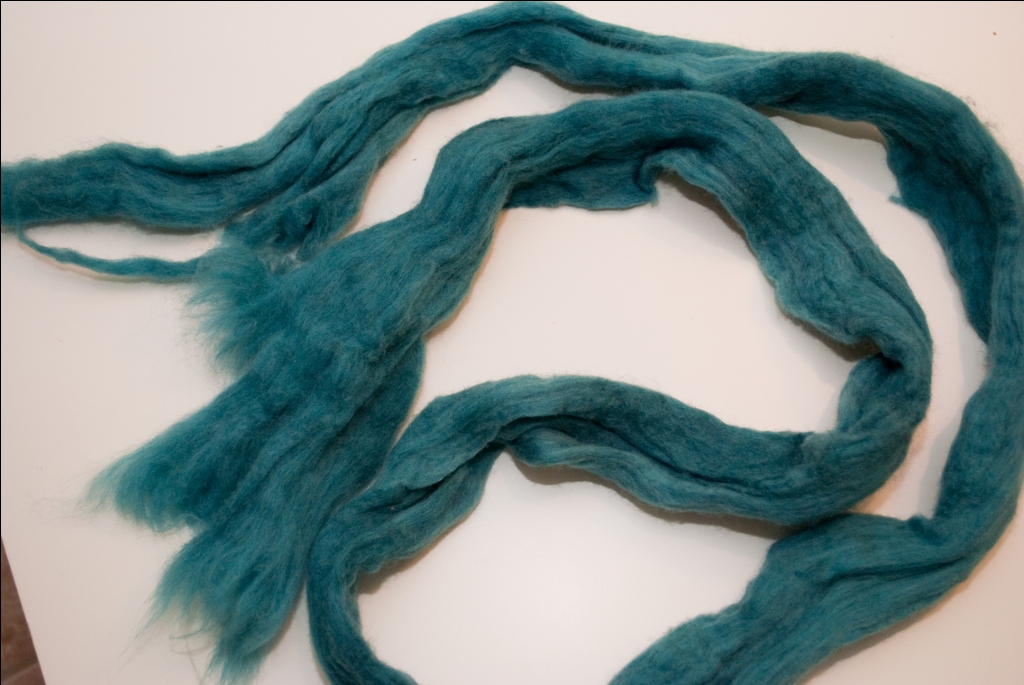
So, lets get to the thrummed mittens!  As I mentioned in my last post, thrummed mittens are the warmest mittens ever!  Pieces of wool roving is knit into the mitts as you make them, and in the end you get mittens with a wool lining in the middle.  They are pretty labour intensive as this involves tearing the roving into little pieces.  If this is your first thrummed mitten project I would suggest you buy a thrummed mitten kit - it usually comes with yarn and the roving.  I personally love the Fleece Artist thrummed mitten kits - I love the yarn/thurm colour combinations, and the pattern is easy to follow.

The roving comes in long piece that you'll have to rip into pieces. 

I normally rip them into 5" long by 0.25" wide pieces.  I usually rip a large piece widthwise across that is 5" long, then rip them into 0.25" pieces.  The first time I made them the lady at the yarn store that sold me the kit told me to the large pieces widthwise with a pair of scissors, then tear into thin strips, but my aunt told me it's better to just rip everything by hand because the roving will mat together better when you wear the mitts, forming a better lining.  I've done it both ways and found my aunt is right :)  Each of these strips must be teased, and elongated - so they are about 7" long.  The better you tease them, the warmer your mitts will be :)  Fold the two ends towards the middle and pinch the middle (your piece will look like a figure 8). 

Most website tell you to rip all the pieces before you begin the knitting process, but if you're anything like me, you're just super excited to get started with the mitts.  What I normally do is just rip some pieces, and when my hands hurt from ripping the roving I switch over to knitting :)

There are different methods to thrumming - ones that make them look like hearts, others that make them look like little balls.  I personally like them looking like little balls :)  Instructions are below:

*Following your thrum mitten pattern* Knit until the pattern calls knitting in the thrumming.
Insert your needle through the hole in the row below located between the previous and the next stitch. 
Take the thrum piece and fold it in half.
Taking the folded piece, fold the thrummed piece over the needle.
Pull the thrummed piece through the hole.  Knit the next stitch.
Pull the thrumming over the knitted stitch.
....like so..... :)
Pull the thrumming from the back (but not too tight!)
 And... volia!  Consider the mitt thrummed!  Continue with your pattern/thrumming.
This is what it should look like when you flip the mitt inside out

Here are a few photos of thummed mitts I made myself.  The first photo is of my very first pair of thrumm mittens I've ever made.  They're big mitts (LoL they look kinda like oven mitts!) but so warm :)  They shrank a little bit when I washed them though..


.... as for my turkey - it was delish! :D

August 25, 2010

More Baby Booties :)

As I mentioned in my previous post I spent this weekend knitting more baby booties. For the blue ones I was knitting, I realized I was running out of yarn while knitting the second bootie and I knew I wasn't going to finish them off. So I ended up knitting the bottoms with some remaining cream-colour yarn I had left over from the first ever booties I'd ever knit. I was a little nervous about how they would turn out, but it looks pretty good :)


For these sets, I didn't want to use a ribbon to tie around the ankle because the ribbon has to be removed whenever the booties need to be washed. I thought it would be nice if the tie was also made of washable yarn so it could all be washed together. I tried looking for some thick bulky yarn but I couldn't find any that wouldn't irritate a baby's skin (most bulky yarn is made from natural fibers, not these nice cashmere/wool blends).
Lynn from Mary's Yarns recommended that I twist together two pieces of yarn. And this is how you do it:
Take a piece of yarn (make sure you have about 3x the length you require).
Twist it the opposite direction that the treads are twisted in until the strands start to twist the opposite way.
Then slowly bring the two ends together so that the yarn strands re-twist around each other to form a thicker yarn.

I did this process twice to get the thickness that I wanted.

Knitting with DPNs

Since I was knitting what felt like a gazillion baby booties this weekend (I finished 2 pairs.. one more to go!) I thought it would be a good idea to write about knitting in a circle with double pointed needles (DPNs). It's not too hard... trust me!


Step 1 - Cast on your stitches on one DPN (or on a long set of needles with a similar needle size as the DPNs you plan to knit with).


Step 2 - divide your stitches on to 3 or 4 DPNs. Just make sure you have at least one needle to knit with (lets call this the knitting needle).


Step 3 - Take our knitting needle and inser the needle knit-wise (or if you're purling, purl-wise) through the very first stitch that was casted.


Step 4 - Complete the stitch using the yarn attached to the last stitch casted.


Step 5 - Keep knitting around in the circle.

Another way you can start knitting the circle is to slip the last stitch cast on to the knitting needle, then follow Step 3 to 5. Just make sure to put a stitch marker between the first and last casted stitch so you know where your row begins/ends :)

It's not too hard, but it may take a bit of practice to make the bridge between the first and last casted stitch are tight together.
Happy knitting! :D