I have to admit, 2013 has been a slow knitting year for me. I didn't knit an awful lot.. a lot less than I would have wanted to.
Hopefully this year will be full of fun knitting projects :) I've already got one in mind - this toddler tiered coat for S :) I already bought the yarn for it.. Cascade 128 Superwash (the same yarn I knit Jo's legwarmers with). It was on sale at Mary's Yarns and I had to snag some today! In fact, I'm tempted to start the project tonight... :)
Wishing everyone out there a safe and wonderful 2014!
December 31, 2013
November 27, 2013
Jo's Leg Warmers
A few months ago my friend Jo (who I've known since high school) approached me about making her a pair of custom leg warmers. She couldn't find any that fit her properly and in a style that she wanted. So I set out to design a custom pair for her.
We started out with the basics - she wanted something warm and cozy, and in a material that was machine washable. My first thought was to use a wool/acrylic blend, but to really make it warm and cozy I thought it would be better to use a merino superwash. I think if budget was an issue I would have definitely chosen the wool/acrylic blend, but because Jo was willing to spend a bit more, I opted with Cascade 220 bulky superwash. It's so soft! :D I'm in love with this yarn :) Plus it came in the colours she was looking for :)
She told me she wanted a gray pair, with a teal stripe down the side with orange buttons on the top. She like the idea of having a cable go down the side with the stripe. The only issue I had with the cables is the fact that a leg calf would cause an uneven stretch along the length, which would distort the cable pattern more at the top (the cables would look more wider at the top). I still wanted to keep the idea of a cable pattern, so I designed it so the bottom half of the leg warmer stripe had a cable detail.
At first I was trying to knit the leg warmer as a round, changing colours without cutting the yarn (imagine the amount of weaving in the ends if I did!), but I found it was too loose between the stripe and the body of the leg warmer. This is when I made the split decision to start over and knit the body of the leg warmer and stripe separately, then kitchener-stitch it together. I found some reddish-orange buttons, and here's what I came up with:

The pieces were knit from the top down. The buttons are in actual button holes - I had to knit an overage piece on the body of the leg warmers and attached the buttons there).
Jo loves them :) And they keep her calves nice and warm :)
November 2, 2013
S and her new hat
I finished S' hat :) It only took a lazy 3 days to finish the hat. I think it turned out well! Here she is rocking her new hat.


Mittens
Cast on 28 sts
Rounds 1-14: k2,p2 ribbing
Rounds 15-22: knit the same mock cable pattern as the hat
Thumb gusset:
Round 23: k1fb, k1fb, knit mock cable pattern
Round 24: k4, knit mock cable pattern
Round 25: k1fb, k2, k2fb knit mock cable pattern
Round 26: k6, knit mock cable pattern
Transfer 6 sts to a stitch holder, cast on 2 sts, then continue the mock cable pattern until about 1” from the top, then do 3 decreases (spaced out as evenly as possible) every other row until you get near the top, then k2tog until you’re left with 4-5 sts (I forgot how many).
For the thumb, pick up 4 sts from the top of the thumb hole, the continue to knit the 6 sts the off stitch holder. Knit in a round until desired length (I did 12 rows), then k2tog until there are 3 sts.
If you need the mitts bigger, the next size up would have to cast on 32sts (multiples of 4) and for the do 4 decreases spaced evenly.
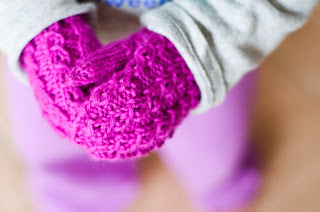
I absolutely love the mitts with the hat :) So happy with them!


In my last post I stated that I was worried about doing the decreases properly. The pattern was a bit confusing, but I managed to figure it out while knitting it. I think understanding the mock cable pattern and thinking a few rows ahead really helped me with the decreases. Basically you are merging two mock cables in the decrease locations - once the cables have merged, you perform the decrease stitches in the next mock cable rows. I contemplated not knitting the ear flaps and putting a pompom on top, but I really liked the idea of strings hanging from the side and wanted a hat that she could wear under her hooded coat.
After knitting the hat, I really wanted a pair of matching mitts. I don't know what it is about having a matching hat and mitts makes it more complete. Since there was not pattern available for mitts I thought I would just make it up myself. I took my knowledge from the mittens I've knit in the past and came up with a pattern. Here's the basics:
Cast on 28 sts
Rounds 1-14: k2,p2 ribbing
Rounds 15-22: knit the same mock cable pattern as the hat
Thumb gusset:
Round 23: k1fb, k1fb, knit mock cable pattern
Round 24: k4, knit mock cable pattern
Round 25: k1fb, k2, k2fb knit mock cable pattern
Round 26: k6, knit mock cable pattern
Transfer 6 sts to a stitch holder, cast on 2 sts, then continue the mock cable pattern until about 1” from the top, then do 3 decreases (spaced out as evenly as possible) every other row until you get near the top, then k2tog until you’re left with 4-5 sts (I forgot how many).
For the thumb, pick up 4 sts from the top of the thumb hole, the continue to knit the 6 sts the off stitch holder. Knit in a round until desired length (I did 12 rows), then k2tog until there are 3 sts.
If you need the mitts bigger, the next size up would have to cast on 32sts (multiples of 4) and for the do 4 decreases spaced evenly.

I absolutely love the mitts with the hat :) So happy with them!
October 22, 2013
After a long hiatus... I'm back (hopefully!)
I have to stop doing this - It's been a while huh?
I went through a bit of a transition the past several months. I lost my job back in February, and I went through a bit of a slump, so being motivated to do anything but look after S was a bit difficult for me. But after some time off, and a much-needed vacation out west (it's amazing what looking mountains for a couple of weeks can do to brighten your mood).
Even though I haven't touched this blog, it doesn't mean I haven't been knitting :) So I have a lot of catching up to do :)
So since it is getting colder, I am looking at knitting S a hat. I've decided on the Double Rib Toddler Hat pattern I found on Ravelry. I like the fact that it has ear flaps, so it will keep S' ears warm. I bought a skein of Cascade 220 in a pink/purple colour from my local yarn shop. Funny thing is, right after I bought that yarn I went to the grocery store, where I found a nice hat/mitten set and bought it for S :) 2 winter hats is not excessive, right?
I'm knitting it with the mock cable. This is what I've done so far (just started today):

I'm a little worried I can do the decreases at the top of the hat properly, as the pattern gets a bit confusing with the mock cable. I just hope I figure it out as I'm knitting it :)
January 23, 2013
Brrr it's cold out!
What an insanely cold day! -20C (much colder with the windchill). On days like these I'm glad I get to stay home and stay cozy with my baby S :D
The cold is definitely a great time to wear knits :) Which is why from now until Thursday (tomorrow) I'm offering 10% off my Etsy store :D
Use coupon code MINUS20.
Stay warm, and enjoy! :D
The cold is definitely a great time to wear knits :) Which is why from now until Thursday (tomorrow) I'm offering 10% off my Etsy store :D
Use coupon code MINUS20.
Stay warm, and enjoy! :D
January 11, 2013
My New Winter Hat
It's been getting cold up here, and I figure why not knit myself a new hat?
I had bought myself some Lion Brand Wool-Ease Thick & Quick from Michaels during their Boxing Day sale, mainly to make a Pixiebell Pixie hat for my sister for her birthday - she LOVED it :) I would post photos of it but it's a photo of me wearing it and I don't do it justice at all. It looks so much better on my sis :) I've been eying that pattern for a while and finally had the time to buy and knit it. I digress...
So back to my hat. I found this cute hat pattern on Ravelry that looked super easy and super quick to knit. It was all of the above :) I love quick knits! I had to modify the pattern because of my small head, and I wasn't using the right needles for the yarn I chose. The suggested needle size was 9US, I had 6.5US and I wasn't about to go out and buy new needles :P

The pattern called for tassels to be put on the back and on the sides of the hat, but I'm not a huge fan of tassels. Plus I ran out of yarn :S I chose to forgo the tassel on the back, and put braids on the sides. To make the braids thicker (because I ran out of yarn), I raided my yarn "odds-and-ends" stash and found this black and white merino yarn I used to make my friend mitts a few years ago.

I think the contrasting yarn colour in the braids looks fun :)
Ironically after I knit this hat, it hasn't been cold enough for me to wear it. It's going to be 11C here on the weekend. Huh?
I had bought myself some Lion Brand Wool-Ease Thick & Quick from Michaels during their Boxing Day sale, mainly to make a Pixiebell Pixie hat for my sister for her birthday - she LOVED it :) I would post photos of it but it's a photo of me wearing it and I don't do it justice at all. It looks so much better on my sis :) I've been eying that pattern for a while and finally had the time to buy and knit it. I digress...
So back to my hat. I found this cute hat pattern on Ravelry that looked super easy and super quick to knit. It was all of the above :) I love quick knits! I had to modify the pattern because of my small head, and I wasn't using the right needles for the yarn I chose. The suggested needle size was 9US, I had 6.5US and I wasn't about to go out and buy new needles :P
The pattern called for tassels to be put on the back and on the sides of the hat, but I'm not a huge fan of tassels. Plus I ran out of yarn :S I chose to forgo the tassel on the back, and put braids on the sides. To make the braids thicker (because I ran out of yarn), I raided my yarn "odds-and-ends" stash and found this black and white merino yarn I used to make my friend mitts a few years ago.
I think the contrasting yarn colour in the braids looks fun :)
Ironically after I knit this hat, it hasn't been cold enough for me to wear it. It's going to be 11C here on the weekend. Huh?
January 2, 2013
Keeping the iPad cozy
Happy New Year! :D
This is a MUCH delayed posting about my cable knit iPad case, but I figure with S sleeping and the hubby still at work I might as well get caught up blogging :) I'm behind on blogging about a few projects :S
Last year I received an email from a lady that had received one of my cable knit iPhone cases as a gift, and she was asking if I could knit her a matching case for her iPad. I was thinking about doing another side by side cable knit pattern similar to my iPhone case, but I felt it would look a little too simple for such a large surface area. I could have done just straight 4 columns of cables, but that didn't seem too interesting to me.
I'm a type of person that appreciates symmetry (sometimes a little too much. One freakish fact about me - when I chew my food I always have to make sure there are equal amounts of food on each side of my mouth. It just has to be symmetrical! LoL). I started to come up with an idea of having the two inner cable columns larger, with the outer cable columns smaller. And this is what I came up with:

Pattern is available to purchase by clicking the "buy now" button below (sold through Ravelry and is a direct file download)

This is a MUCH delayed posting about my cable knit iPad case, but I figure with S sleeping and the hubby still at work I might as well get caught up blogging :) I'm behind on blogging about a few projects :S
Last year I received an email from a lady that had received one of my cable knit iPhone cases as a gift, and she was asking if I could knit her a matching case for her iPad. I was thinking about doing another side by side cable knit pattern similar to my iPhone case, but I felt it would look a little too simple for such a large surface area. I could have done just straight 4 columns of cables, but that didn't seem too interesting to me.
I'm a type of person that appreciates symmetry (sometimes a little too much. One freakish fact about me - when I chew my food I always have to make sure there are equal amounts of food on each side of my mouth. It just has to be symmetrical! LoL). I started to come up with an idea of having the two inner cable columns larger, with the outer cable columns smaller. And this is what I came up with:
Pattern is available to purchase by clicking the "buy now" button below (sold through Ravelry and is a direct file download)
Subscribe to:
Comments (Atom)